
Shrink combo systems use an L Bar sealer and shrink tunnel to shrink package products in one continuous line. The combination of both machines streamlines the shrink wrapping process. Manufacturer differences and features should factor into which shrink combo system works best for your application. Find out what to look for in a shrink combo system.
The basic description of a combo unit composed of an L bar sealer and tunnel in a continuous line neglects several factors in these devices. Lower-priced models will have fewer flashy features and probably lower-quality sealing elements. All of this will be covered as we delve into what is a shrink combo system step-by-step. We feel aside from the photos and videos linked below, the best description would be explaining how a combo machine works, then highlighting different components along the way.
How to Operate a Shrink Combo Machine
- Shrink Film Loading & Dispensing – Before a package can be completed, a shrink material must be loaded onto the dispensers. When choosing a machine, be sure the dispenser found on the device will fit the size of roll you need.
All combo systems will have a film dispenser. Sometimes the dispensers are lower on the machine with threading guides for film, while others may have the dispenser flush with the sealer. Either design works fine as long as the roll fits on the dispenser and is kept from walking side-to-side. With roll guides, smaller widths can be used without moving on the film dispenser.
Follow the machine threading instructions and pull the material into the sealing area. Place the product being sealed in the front right corner of the sealer. Be sure the product stays away from the edge of each side, one half to one full inch. This space allows the material room to shrink down in the tunnel. After the material is lined up to make a seal, remove the product and make the first seal with only the material in the sealing area. This initial seal creates a pocket that is used for the next step. Minor adjustments may need to be made. The goal for the correct heat setting is for a clean seal and cut. Any tugging or difficulty pulling away the material from the sealing area should not be required when using correct heat settings.
- 2. Loading Products into the shrink film – Located on the L bar sealer, close to the film rack, a film separator and work area should be located. Because a centerfold shrink film is used, the film separates the top and bottom layers to form a pocket for products to be enclosed.
This enclosure is the reason we made the seal in step one. There should be a corner in the material to fit products. Easily slide products onto the film separator tray and into the shrink wrap.
- 3. Moving products into the sealing area – With both hands, move the products into the sealing area from the loading tray. Be careful not to break the front seal that has already been made. Once products are in the sealing area, try to get wrinkles and folds out of the material before making a seal.
- 4. Making a Seal and Closure – After the product being wrapped is in the shrink film and on the L bar sealing area, the bar should be closed, and a seal should be made. This can be done in many ways depending on the features of each machine. Some of these options will be discussed further down the page. No matter the options available, a clean seal should be made once the bar is pulled down because of the adjustments made in step one.
- 5. Transporting products into the shrink tunnel – After the seal is made, the enclosed products need to be moved into the heat tunnel to shrink the materials around them. Base model machines require the user to pick up products to place them onto the tunnel conveyor. A transport conveyor is an added feature popular with these machines. The transport conveyor moves products into the tunnel without the user touching the product.
- 6. Shrinking products in the heat shrink conveyor – Temperature and speed adjustments are crucial in finding the right tunnel settings. There is a good chance several products will need to be tested before perfectly shrinking in the corners. For an expedited setup, here is an entire article explaining how to set shrink wrap machine. Once you dial the heat and speed settings in, products will come out of the shrink tunnel exit.
- 7. Catching products out of the heat tunnel – The material thickness can be an enormous factor in the temperature of the product coming out of the heat tunnel. Thick, polyethylene shrink bundling film is often run through at 350 degrees Fahrenheit or more making it difficult to handle. We recommend a conveyor, bin, or lazy Susan for the product to rest for a short period.
Features Found on Shrink Combo Systems
Now we know how to wrap a product with a combo system, let’s cover some available features and how they can impact efficiency and ease of use. We will be sure to reference which step in the operation process the feature impacts
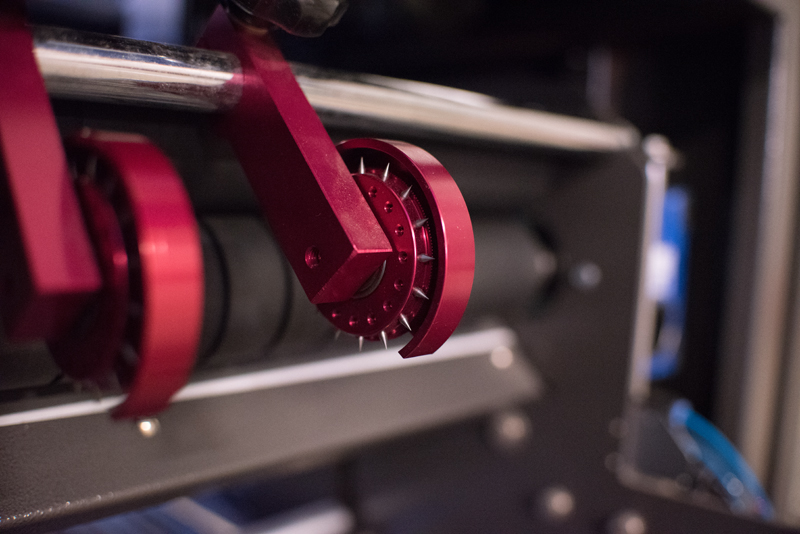
A. Perforating Wheels – Small spikes on a wheel rotate as the shrink film is pulled from the dispenser. The perforator requires proper orientation during step one to produce small holes in the shrink wrap as the film is dispensed. Step number six is also greatly affected by the perforating wheel. Small holes are placed into a shrink film for heated air between the product and shrink wrap to escape once heated. Having the right amount of perforations in the needed spots will do wonders for the heat shrinking process. Especially important in corner areas of the film, the tiny holes allow the material to conform to the product being wrapped fully.
B. Stainless Steel Film Separator/work tray – In step two of the process, materials are placed into the centerfold film by sliding products onto the tray and into the shrink wrap. A stainless steel loading tray is necessary if there will be any direct food contact. Most products already have a container holding them before being placed onto the work tray, but a stainless steel loading area will be required if consumable foods directly contact the machine when the product is being loaded.
C. Air Operated L Bar Pull Down – Foot pedal or push button, an air-operated shrink combo system closes the L bar sealer (step 4) without trouble. Most combo systems do not feature a pneumatic option; this feature is considered top-of-the-line for a combo system.

D. Sealing Bar Magnets – After the sealng bar is closed in step four, magnets hold the bar closed for a set time until the seal is complete. Most models come standard with this option, but some basic models will not have it. Instead, the operator will have to stand pressing the sealer down until the seal is complete.
E. Hot Knife, Wire, or Micro-knife Sealing Wire – Step four in operation is the sealing action. The type of sealing blade will determine the types of materials and thicknesses that can be sealed and impact the longevity of the sealing element.
Basic sealers have wire sealing elements. Wire sealing elements are used in basic impulse sealers and L bar sealers. The wire conducts electricity, which causes heat to melt and mend the shrink film together. Like a filament light bulb, the element will burn out over time.
A step up from a sealing wire is a micro knife, thicker than a sealing wire but functions the same. A terminal at each end of the sealer sends electricity through the blade to heat and mend material. Over time they will eventually burn out, but with proper maintenance, micro knives will last much longer than wire sealers.
A hot knife is the best option for the longest-lasting sealing element and complete temperature control. Set the temperature of each sealing arm with a thermostat and seal thicker materials in high volumes. Hot knives are thick metal edges that have consistent heat during operation. The sealing area can last for years if taken care of correctly.
F. Scrap Wheel – As the material is sealed with an L bar sealer, excess film on the front sealing bar can add up. A scrap wheel is a feature that catches scrap material as the machine is in operation—helping to maintain a safe and efficient working environment.
G. Seal Area Vertical Product Adjustment – During step four, the sealing process, it is nice to have the seal close to the middle of the product for proper shrinking. A vertical product adjustment lowers the sealing area for the seal to be made near the center of the product.
H. Take Away Conveyor – After the seal is made, step five is transporting sealed products from the sealer to the shrink tunnel. Base model machines require the operator to pick up the product and place it into the shrink tunnel.
An upgrade and an efficient add-on is a takeaway conveyor. After the seal is complete, the takeaway conveyor engages and moves the product from the sealer to the shrink tunnel. This time allows users to reach and grab the following product while the machine is transporting the recently sealed product. It is one less step for the operator, equating to many more products wrapped daily throughout an eight-hour shift.
I. One Piece or Two Piece Machine – Combo units can be one piece or a matching sealer and tunnel to be placed next to each other for production. Each type has advantages and disadvantages.
One-piece shrink combo units have one plug-in and power requirement. Adjustments can be easier and quicker with one-piece combo machines. Larger one-piece machines can be bulky and difficult to ship or move.
Two-piece machines will have two power requirements and plugs. The additional power can be advantageous for high production. Two-piece combo systems ship on two pallets, making them less susceptible to damage during shipping.
J. Product Tunnel Centering – This can solve problems experienced during step five of the process listed above. For one-piece machines, this feature allows users to line up the sealer for products to be transported down the middle of the shrink tunnel for maximum airflow. This is unnecessary for two-piece machines because the sealer can be orientated to convey products through any tunnel location.
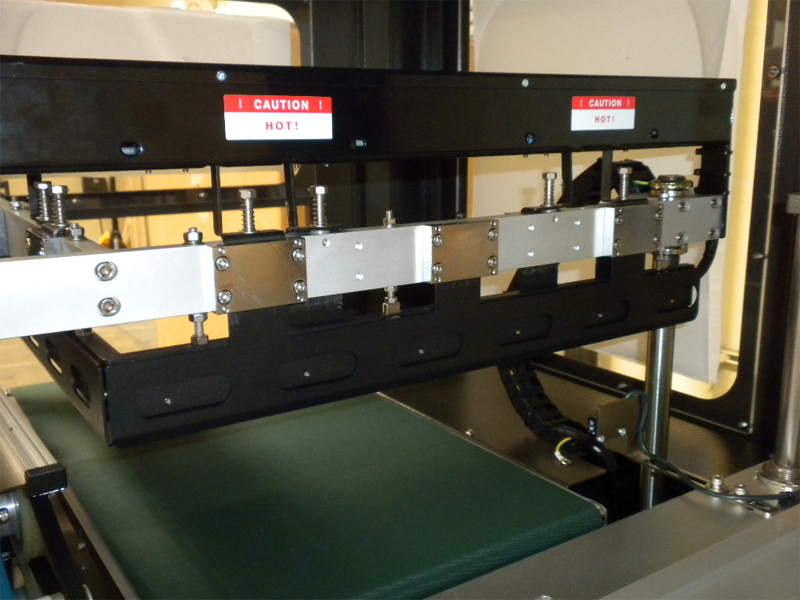
K. Teflon Belt, Roller Rod, or Stainless Mesh Belt – In step six, products move through the shrink tunnel on the conveyor for shrinking. The conveyor can be made of many different materials depending on the shrink wrap used, products being wrapped, and expected tunnel heat requirements. Below are three standard tunnel conveyor options, but more are available depending on the manufacturer.
Roller Rod – Bars spaced out and moving across the width of the shrink tunnel. They are often coated with Teflon to keep products from sticking and the rods from becoming too hot.
Teflon Belt – A belted conveyor with small holes to allow airflow. Perfect for smaller and lighter products.
Stainless Mesh Belt – Perfect for packaging food products. Some regulatory agencies require stainless during production.
L. Tunnel Blower Adjustments – As products move through the heat tunnel for shrinking the material in step six above, some tunnels have a blower adjustment feature. This allows the user to control airflow as products move through the shrink tunnel.
M. Tunnel Temperature Setting Controls – Two basic controls for shrink tunnels are the conveyor belt speed and the temperature of the shrink tunnel. Lower-priced tunnels will have analog control turn dials. A step up would be digital heat settings to adjust the tunnel with precision as products pass through on step six.
Commonly Asked Questions About Combo Machines
How much power is required?
Small combo systems can run on 110/120v or standard home power outlets. Ensure no other devices are plugged into the outlet the machine is using. A 208v/220v power supply will be needed for large combo systems. More extensive tunnels can require three-phase 208v/220v power.
How large is the machine footprint?
Because combo systems are in-line machines, they are longer and can take up some floor space. Smaller devices can be 25 inches wide but 75 inches long. Longer sealers and tunnels will take up more of a footprint, especially in length.
How many plug-ins will be needed?
With a one-piece tunnel and sealer, only one plug should be required. Two-piece systems will require two plugs and possibly a different power requirement for each plug.
How do they ship?
Due to the size, all machines ship via freight on a pallet or crate.
How many products per minute can a shrink combo system wrap?
It will depend on the operator, but 7-12 products per minute can be attained.
How many types of shrink combo systems are there?
Multiple manufacturers around the world make a form of shrink combo system. Each system has different components, designs, and features.
What machine is more efficient than a combo system?
An automatic shrink wrap machine is the next logical step from a shrink combo system. It will save time and substantially increase speeds.
What is the starting price of a combo unit?
Base model combo units can start at $5,000 – $6,000. Many of the features mentioned above will not be available for this price.
Combo Conclusion
To answer the question of what is a shrink combo machine, knowing the general operation of the device helps understand what it is, what it does, and how it will speed up packaging production. An L bar sealer plus shrink tunnel combines fast sealing and shrinking in one device. The features and upgrades available can increase speed and obtain a better shrink, but they come at a price. Be sure whichever system and model you choose, support, and replacement parts are available. For more information, call 1-800-441-5090 and speak with someone today or shop shrink wrapping combo systems online now.
