
Using a shrink wrap machine from home is perfect for anyone starting a new business or introducing a new product. Companies around the world sell anything from custom made knives to baked goods packaged in shrink wrap. Large multi-billion dollar companies use shrink packaging and home operated businesses can shrink wrap products with the same end look.
Home use shrink wrap machines are easy to find, you can begin shrink wrapping within minutes of arrival. The issues to watch out for are poor quality machines, sourcing replacement parts, and materials when needed. Below we will cover how to shrink wrap at home and easily avoidable mistakes before and after buying a shrink wrap machine for home use.
Machine Options
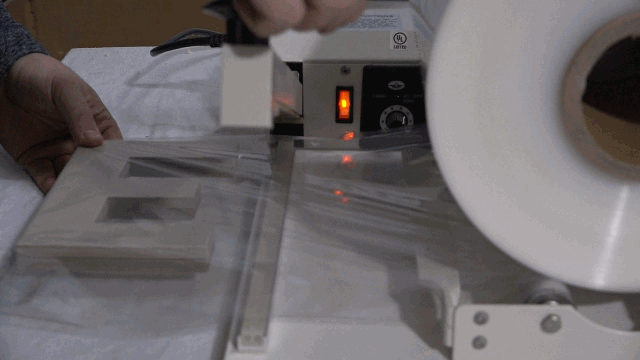
The two most common home use shrink wrap machines are impulse sealers and I-Bar sealers. Each machine uses a single-sealing wire to seal and cut shrink film. The wire seal time is controlled by an adjustable knob close to the seal light. The seal timer sets how long the sealing wire is actively heating.
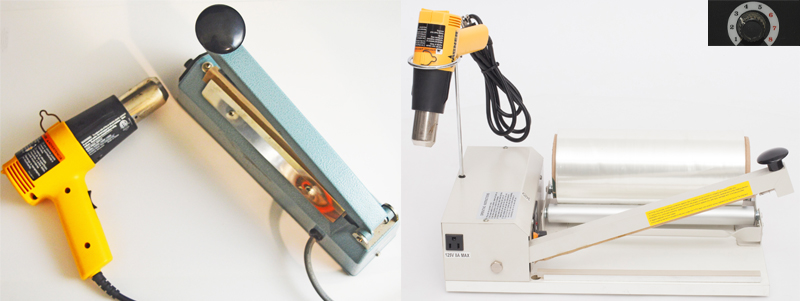
The advantage of the I bar sealer is the film rack and separator are both connected to the machine. The single platform design is available in multiple widths to accommodate products in many sizes.
The impulse sealer does not have a film rack. Impulse sealers are often used with shrink bags for home use shrink wrapping. Buying shrink bags to accommodate products of the same size can be a quick and easy way to shrink wrap at home.
Sizing
It is important to determine the right size of machine to accommodate all of the products being wrapped. We recommend an I bar sealer for multiple product sizes and an impulse sealer for one or two product sizes.
The centerfold film used with an I bar sealer can wrap large and small products with one roll of film. Bags are limited to the size of products that can fit in each bag.
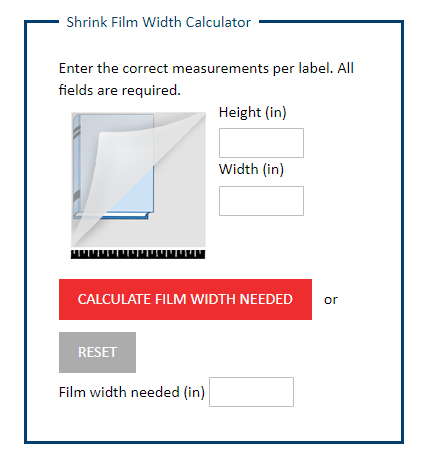
Be sure to order a sealing bar that will seal the largest product being wrapped. Read our guide on how to measure for the right material or use our shrink film calculator to be sure and purchase the right size of shrink film.
How To Make Your First Seal
Each machine will have an adjustable dial for the sealing time. Turn the seal time to a 2 or 3. At the end of the cycle, the sealing light will turn off. After the light goes off, keep the sealing bar held down while removing excess film. If the product does not easily pull away, slowly increase the seal time.
If using centerfold shrink film, the product will need to be rotated and an additional seal will need to be made. When using a bag, the impulse sealer will only need to make one seal for the product to be fully enclosed.
How To Shrink Your First Package
After seals have been made to fully enclose the product, heat should be applied. For home use applications, the most common way to apply heat is a heat gun. Some people shrink wrapping at home use a shrink tunnel. Due to the initial cost of a shrink tunnel, people wait until wrapping more than 200 products per day to consider the purchase of a shrink tunnel.
If using a heat gun, remember to start off in low heat. Always keep the gun moving around the package to avoid burn holes. As the film begins to shrink, corners will need more heat to push down excess film.
The heat gun should not come closer than 6 inches to the shrink film. Burn holes can happen quickly if the heat gun comes too close. The finished package should be tightly shrunk to the product with crystal clear visibility.

Troubleshooting Home Use Shrink Wrapping
The I-bar sealer or impulse sealer will not make a complete seal.
Increase the sealing time.
Replace Teflon tape over the sealing wire.
If multiple seals have been made, the sealing wire may need to be replaced.
Seals Come Open
Leave room between the product and the sealing wire. Allow room for the film to shrink.
A thicker shrink material may be required for a stronger seal.
If seals open when using a heat gun, hold the gun further from the product on low heat.
Burn holes when applying heat
Hold the heat gun further from the shrink film.
Turn the heat gun to the lowest setting possible.
Always keep the heat gun moving while in use.
The shrink film has wrinkles after the heat has been applied
More heat is needed to fully shrink the film
Film bunching in the corners of the product (Dogears)
Apply more heat to the corners with the heat gun away from the product. Use your thumb to press down the corner film after the heat has been applied.
Questions and Comments
Ordering the wrong products can be a real bummer. If you have questions about ordering the right machine or materials call us (1-800-441-5090) or send an email to customerservice@uspackagingandwrapping.com.
